October 17, 2013

Healing Crystals


Fall is a time of year when I need a lot of healing. I always enjoy the initial change of seasons, the cool breeze after a hot, humid summer and who doesn't love watching the leaves change colors, from green to bright red and orange. There is something so cozy about all of it. But inevitably, after all the leaves have floated away, the dark & dry days get to me. It's around this time that I find myself drifting towards these beautiful, healing crystals. 

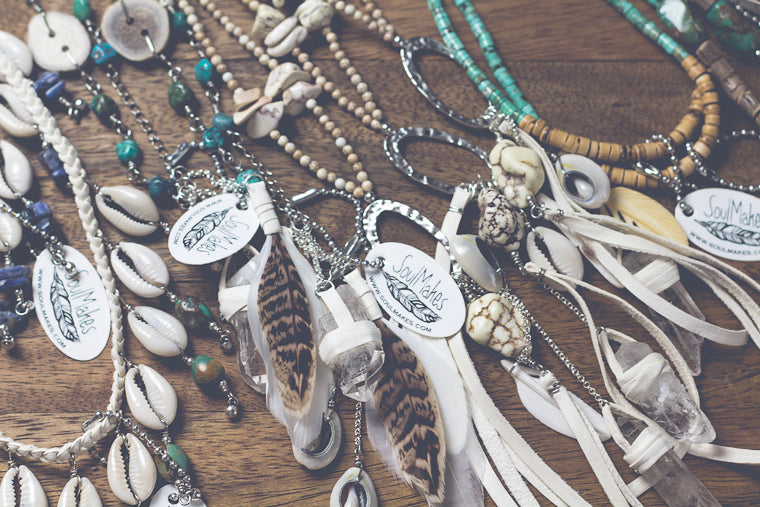
I'll admit I'm no expert on the subject, what I know about crystals comes from my own experiences with them and a bit of reading over the years. It's no coincidence that I find myself, with little thought, decorating our home with pyrite, after all it's an energizing stone. If you're like me, the lack of sunlight at this time of year can be really draining, pyrite is the perfect remedy. I seem to naturally gravitate towards using crystals in my jewelry designs as well. We have some really gorgeous new necklaces handmade with these amazing stones, captured in a macrame style weaving. These creations were definitely inspired by the season! I'm really loving the citrine pieces. Citrine is a bright and joyful crystal, bringing light to many aspects of life. It is known as the "success stone" because it brings good fortune and luck to it's owners. You can read more about each of these beauties in our shop! We also have some stunning new wall hangings coming soon, handmade with larger citrine and rose quartz crystals, these beauties are adorned with feathers and shells. We can't wait to show you our home decor section (also featuring dream catchers!).


Have a beautiful day!

Love,
MacK Mars


Follow SoulMakes on Bloglovin

October 15, 2013

Finally Fall


Fall has finally arrived here and we couldn't be more excited. Our home is littered with tiny little pumpkins and squashes. We have candles burning all day and of course SoulMakes fall collection is scattered about our home studio. We often times look around our place in wonder at the warm and cozy atmosphere we've created. It's a small space but it's so filled with love and it had me feeling very inspired, so I created this little Autumn vignette to share with you all. I love arranging these gorgeous still lifes in our home, often inspired by our latest jewelry creations. It's important for me as a designer to be able to see our beautiful pieces on display and it seems to promote even more inspiration in me!

I hope you all are enjoying fall as much as we are!
Have a beautiful day,
MacK Mars


Follow SoulMakes on Bloglovin

October 9, 2013

DIY Coffee Filter Flowers


This DIY is super fun and easy and can be done in a variety of ways. The first part is dyeing your coffee filters, all you need is:
Coffee Filters
Acrylic paint
Bowls & Water

Fill some large plastic bowls about halfway, with water. Add a glop of acrylic paint and stir. This is a very simple way of dying the paper, mostly because I happened to have all these supplies lying around my house on any given day. But you could also go to the store and get some more traditional dye. Drop a handful of filters into each color, ring them out and set them aside to dry.


This part is, of course, optional. You could also use colored tissue paper rather than dying your own paper.


Once the coffee filters are dry(let them dry overnight), you'll need a pair of scissors and some wire.


1. Grab a handful of dried coffee filters
2. Fold into fourths
3. Cut petal shape out of the wide fan part of your filters
4. Cut a graduated variety of sizes, unfold them and lay them on top of each other (You'll want at least two of each size. You can go as big or small as you want!) 
5. Cut about a foot of wire, make a 'knot' at one end of your wire and stick the other end through the middle of all your filters. (the knotted end will keep the wire from slipping all the way through the paper)
6 & 7. starting with your smallest cut out, begin peeling up each layer of paper one by one, fluff as needed.
8. Pinch the bottom of the flower to create a good shape
9. Wrap the wire around the base a few times to hold it all together
10. Beautiful finished flower!
Have fun with this, try all different shapes and sizes. I definitely want to do this again and experiment with different types of flowers!

If you want to, you can make a stem for these beauties very easily. (I made some with and some without)

All you need is:
Paper flowers
Newspaper
Floral Tape

1. Tear off a small piece of news paper
2. Roll it up, long ways
3. Using the excess wire hanging out of your flower, wrap the rolled paper onto the pinched base. Twist the paper a bit and continue wrapping the wire all the way down.
4. Add floral tape, start from the top and cascade your way down to the end of the stem! (You could wrap leaves in as well, if you want to get super creative. But I liked the look without leaves.)

Side Note: If you don't do a stem you can use the excess wire to wrap you flowers around all sorts of things around you house (IE. a bed post, a stair rail, a chair back, shutters etc etc)

Here's what I did with some of my gorgeous paper flowers..


(Mountain Mama Necklaces by SoulMakes)

I hope this inspired you all to get creative!
Have a beautiful day!
Love,
MacK Mars


Follow SoulMakes on Bloglovin

October 7, 2013

Wonderful Weekend


We had a wonderful weekend filled with creativity, fun & photo shoots. We're so excited to announce to our Aussie friends that we have a new stockist in Busselton, WA. The beautiful people at Keshi will now be carrying SoulMakes along with an array of organic skin care products and so many other lovely gifts . We packed up some of our favorite pieces to send their way, so many feathers, shells and vibrant turquoise nuggets! I just couldn't resist snapping a couple of photos of these beauties. Keshi's shop looks so amazing, I wish we could pop in for a visit! Be sure to stop by for us if you're in the area.

Hope you all had a gorgeous weekend!
Love,
MacK Mars

Follow SoulMakes on Bloglovin

October 2, 2013

Painted Sticks DIY


This is one I've always wanted to try, it's a two part DIY. For the first part all you need is:
Paint
Sticks
Paint Brush

Paint away!


When the paint has dried you can get started with the second part of this DIY.  This is where you really get creative. You can do so many things with these painted beauties, the possibilities are endless. I made a little frame using:

Photographs & Artwork
String
Paper clips or clothes pins


Simply lay out your chosen photographs to get a good idea of where to tie your string. Knot the string and use paper clips(or clothes pins) to attach the photographs, then hang it on your wall!


You can also do some fun designs with paint markers. I used a black paint marker to add some patterns. These are so fun just to have sitting out on your coffee table, they add the perfect pop of color to any room.


My favorite is the spirit stick. Tie on some leather and ribbon and add feathers, beads and shells. Then you can make a beautiful little display in your home. We like to have a little "sacred space" where we display our favorite chachkies, this was a perfect new addition.


I hope this inspires you all to get creative!
Have a beautiful day
Love,
MacK Mars

Follow SoulMakes on Bloglovin